Joint compound, also known as drywall mud, is an essential material for this task.
In this guide, we will explore the process of adding joint compound to plasterboard or sheet rock, including what tools and materials are needed, as well as tips for achieving a smooth, professional-looking finish.
In this guide, we will explore the process of adding joint compound to plasterboard or sheet rock, including what tools and materials are needed, as well as tips for achieving a smooth, professional-looking finish.
The key thing is patience. Rushing such a repair job reduces your chances of a super smooth result.
Here's a step-by-step guide on how to use gib or plaster to fix a hole in the wall:
Sure, here's a step-by-step guide on how to use gib or
plaster to fix a hole in the wall:
- Gather
the necessary tools and materials:
- Putty
knife or metal trowel or spatula
- Joint
compound (also known as "gib" or "plaster" or "spackle")
- Sandpaper or sander
- Paint
or primer
- Paintbrush
or roller
- Water
- Clean cloth or sponge
- Prepare
the hole:
- Clean the area around the hole to remove any dirt or debris. You can use a box cutter to remove unwanted gib board:
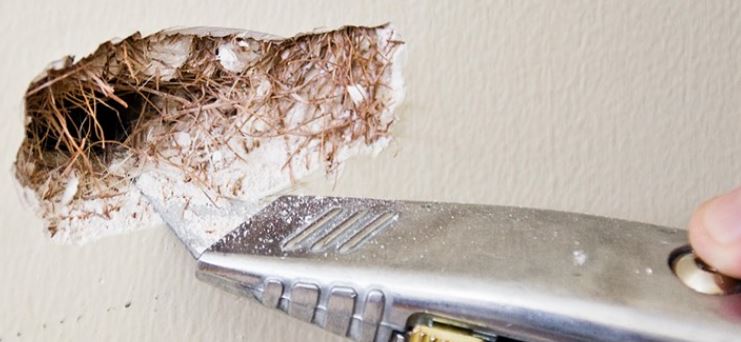
- If necessary you can place a piece of wood inside the cavity, level with the hole to give the mud something to stick against. This guide will show you how to repair especially large holes.

- You can consider using a drywall patch too. More detail below.
- Apply
the joint compound:
- If you have powdered compound, mix
a small amount of joint compound with water to create a paste-like
consistency. Do not over water.
- Use
the putty knife or trowel to apply the joint compound to the hole, ensuring that it
is level with the surrounding wall surface. Using smooth strokes is key. Try to not place excess compound on as excess means more sanding.
- Allow the joint compound to dry completely (this may take several hours to a full day, depending on the size of the hole and the humidity level of the room).

- Sand
the surface:
- Once
the joint compound is properly dry, use fine-grit sandpaper to smooth out the
surface of the patch. You can do this by hand or with an electric sander.
- Wipe
the area clean with a damp cloth or sponge to remove any dust.
- Paint
or prime the area:
- Apply paint or primer to the patched area to match the surrounding wall.
Safety precautions:
- Wear
protective gear, such as goggles and a dust mask, when sanding the joint
compound.
- Be
sure to work in a well-ventilated area to avoid inhaling dust or fumes.
Additional resources:
- The
website of the Drywall, Ceiling & Interior Systems Construction
Association (DCISA) provides detailed information on drywall installation, repair and
finishing, as well as industry standards and best practices.
- The
website of the Home Depot has a wide range of
information on wall repair, including a variety of tutorials and videos on
drywall repair.
Please note that the information provided above is general
in nature and should not be considered as professional advice. It's always best
to consult with a professional if you have any doubt regarding a task or a job
you are planning to do.
You know you're gonna...
Incorrect mixing of the joint compound: If the joint compound is not mixed properly or in the correct ratio, it may not adhere properly to the wall or may dry too quickly. DON'T ADD EXCESS WATER to make it go further.
Uneven application of the joint compound: Applying the joint compound unevenly can result in an uneven surface, which may require additional sanding and patching which takes time your probably don't even have.
Shrinking or cracking of the joint compound: Joint compound can shrink or crack as it dries, which can result in an unsightly finish - this is why a second coat is often a good idea.
Bubbling or blistering of the joint compound: Bubbling or blistering can occur if the joint compound is applied too thickly or if there is excess moisture in the wall.
Drying too quickly: Joint compound can dry too quickly in some cases, causing cracks. This can occur if it's too hot or humid.
Difficulty in getting the desired finish: Joint compound can be difficult to work with, particularly if you are not familiar with the technique, and can result in an uneven finish. Less is more in this case and is a reason why proper sanding technique is important to remove unwanted plaster.
Always follow the manufacturer's instructions for mixing and applying the joint compound. This makes perfect sense right, they designed and made their product, they know how it works
Use a high-quality putty knife or trowel and sandpaper to ensure a smooth, professional-looking finish. You might be tempted to get the cheap $5 plastic compound knife to save a buck. Don't, get the metal one. Trust me, you get a better result using metal over plastic.
Take the time to properly prepare the surface before applying the joint compound. This includes cleaning the area, covering the edges of the hole with masking tape, and ensuring that the surface is dry. A bid of sanding never hurts. The time to prepare your plasterboard should probably take longer than the actual plastering itself.
Apply the joint compound in thin layers, allowing each layer to dry completely before applying the next. This will help prevent cracking and shrinking as the joint compound dries.
Sand the surface of the joint compound after each layer, using fine-grit sandpaper, to ensure a smooth finish. Give each layer about 24 hours until it's properly dry enough for sanding.
Use a damp cloth or sponge to remove any dust from the surface before painting or priming the area. You can also use a broom or brush or vaccumn cleaner!
Always use a dust mask when sanding and working with joint-compound to protect your lungs from inhaling dust and fumes. That shit gets every where so this is really good advice to follow.
It's pretty obvious but use a paint or primer that matches the color and finish of the surrounding wall to make the repair less noticeable.
If you are using powder compound rather then preprepared try to avoid using too much water when mixing the joint compound, this can cause the compound to be too wet and it will take longer to dry. Again, follow the instructions!
When working with joint compound, keep in mind that it can be a messy process. Be sure to protect your floors and furniture with drop cloths or plastic sheeting.
Here are some things that can go wrong when using joint compound to plaster a wall or fix a hole in the plasterboard
Incorrect mixing of the joint compound: If the joint compound is not mixed properly or in the correct ratio, it may not adhere properly to the wall or may dry too quickly. DON'T ADD EXCESS WATER to make it go further.
Uneven application of the joint compound: Applying the joint compound unevenly can result in an uneven surface, which may require additional sanding and patching which takes time your probably don't even have.
Shrinking or cracking of the joint compound: Joint compound can shrink or crack as it dries, which can result in an unsightly finish - this is why a second coat is often a good idea.
Bubbling or blistering of the joint compound: Bubbling or blistering can occur if the joint compound is applied too thickly or if there is excess moisture in the wall.
Drying too quickly: Joint compound can dry too quickly in some cases, causing cracks. This can occur if it's too hot or humid.
Difficulty in getting the desired finish: Joint compound can be difficult to work with, particularly if you are not familiar with the technique, and can result in an uneven finish. Less is more in this case and is a reason why proper sanding technique is important to remove unwanted plaster.
Here are some general tips for when using joint compound on drywall:
Always follow the manufacturer's instructions for mixing and applying the joint compound. This makes perfect sense right, they designed and made their product, they know how it works
Use a high-quality putty knife or trowel and sandpaper to ensure a smooth, professional-looking finish. You might be tempted to get the cheap $5 plastic compound knife to save a buck. Don't, get the metal one. Trust me, you get a better result using metal over plastic.
Take the time to properly prepare the surface before applying the joint compound. This includes cleaning the area, covering the edges of the hole with masking tape, and ensuring that the surface is dry. A bid of sanding never hurts. The time to prepare your plasterboard should probably take longer than the actual plastering itself.
Apply the joint compound in thin layers, allowing each layer to dry completely before applying the next. This will help prevent cracking and shrinking as the joint compound dries.
Sand the surface of the joint compound after each layer, using fine-grit sandpaper, to ensure a smooth finish. Give each layer about 24 hours until it's properly dry enough for sanding.
Use a damp cloth or sponge to remove any dust from the surface before painting or priming the area. You can also use a broom or brush or vaccumn cleaner!
Always use a dust mask when sanding and working with joint-compound to protect your lungs from inhaling dust and fumes. That shit gets every where so this is really good advice to follow.
It's pretty obvious but use a paint or primer that matches the color and finish of the surrounding wall to make the repair less noticeable.
If you are using powder compound rather then preprepared try to avoid using too much water when mixing the joint compound, this can cause the compound to be too wet and it will take longer to dry. Again, follow the instructions!
When working with joint compound, keep in mind that it can be a messy process. Be sure to protect your floors and furniture with drop cloths or plastic sheeting.
What is the correct grit sand paper to sand dry joint compound?
It is important to note that the grit of sandpaper you use will depend on the specific task you are performing and the condition of the drywall surface.
For example, if you are sanding a surface that has rough or uneven areas, you may need to use a coarser grit (80-100) to remove the excess joint compound or texture. However, when sanding the final coat of joint compound, the finer grit (120-150) will be appropriate to achieve a smooth finish.
Just don't sand off too much!
Using drywall patches for small holes
Applying a drywall patch kit is a relatively simple process that can be done by a DIY homeowner. Here is a step-by-step guide on how to apply a drywall patch:
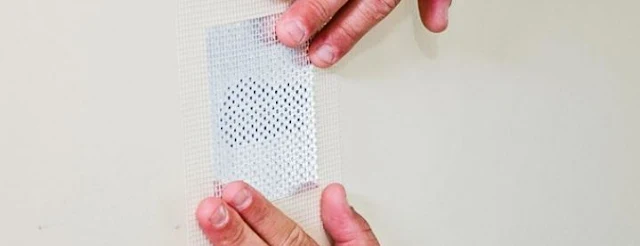
- Gather materials: You will need a drywall patch, drywall joint compound, a trowel or patula, a sanding paper.
- Cut the patch: Cut the drywall patch to the size of the hole you need to repair, leaving about an inch of overlap on all sides.
- Attach the patch: Place the patch over the hole and secure it to the wall with drywall screws. Make sure the patch is quite flush against the wall and there are no gaps between the patch and the wall.
- Apply joint compound as discussed in the guidance above.
Remember the patch acts more as a cover, it is not a replacement of the damaged gib board. For bigger holes, it is best to replace the missing sheet rock.
In conclusion, patching drywall is a relatively simple process that can be done by a DIY homeowner.
In conclusion, patching drywall is a relatively simple process that can be done by a DIY homeowner.
With the right tools, materials, and a bit of patience, anyone can repair holes in their walls and make them look like new again.
By following the steps outlined in this guide, you can successfully patch your drywall and get professional-looking results.
Remember to work carefully and take your time, and don't hesitate to consult a professional if you have any doubts or concerns.
With a little effort and care, you can have walls that look as good as new.