⛓The Ultimate Guide to Properly Sharpening a Chainsaw
Have you ever tried to carve a leg of lamb with a blunt knife or shave with a dull razor? It is a frustrating, ineffective experience — and the same is true of running a chainsaw with a blunt chain. At best the job takes longer and is much harder work, and a dull chain piles unnecessary wear onto your bar and sprocket. At worst, a blunt chain grabs, glances, or has you forcing the saw, which is exactly how people get hurt. If you have a job to get done, you need a sharp machine.
The maintenance of your chainsaw is crucial, and knowing how to sharpen the chain properly is a core part of it — one of the four basic rules of chainsaw chain maintenance, alongside tension, oiling and depth-gauge care. It is a simple task, but only if you apply the principles correctly. The goal never changes: sharpen every cutting tooth to the same edge, the same angle and the same length so the saw cuts straight, smooth and safe.
How to Sharpen a Chainsaw Chain in 5 Steps
- Secure and inspect the saw. Switch off the chainsaw, disconnect the spark plug cap or remove the battery, put on gloves and safety glasses, clean the chain, tension it correctly and clamp the guide bar firmly. Replace the chain instead of sharpening it if you find cracked cutters, damaged links or loose rivets.
- Choose the correct file and angle. Match the round-file diameter to the chain pitch and manufacturer’s specifications. Fit a file guide, follow the angle marked on the cutter, usually around 30 degrees, and keep roughly one-fifth of the file above the top plate.
- Sharpen every cutter facing one direction. Mark your starting tooth with a permanent marker. File from the inside of the cutter towards the outside using two or three firm forward strokes. Lift the file on the return stroke and use the same pressure and number of strokes on every tooth.
- Sharpen the cutters facing the other direction. Turn the saw or move to the other side and repeat the process. Keep the filing angle consistent and make every cutter the same length. Unequal teeth can cause the chainsaw to pull or cut in a curve.
- Check the depth gauges and finish the job. Place a depth-gauge tool over each raker and use a flat file to remove only the metal protruding above it. Round the front edge of each raker, brush away the filings, check the chain tension and confirm that chain oil is reaching the bar before cutting.
The Science of a Sharp Chain
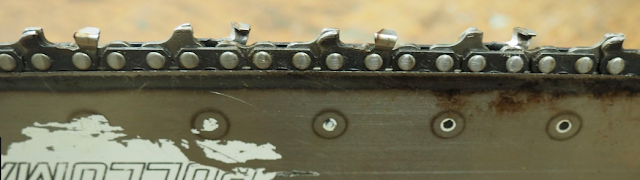
A chainsaw chain does not just cut; it chisels. Each cutter tooth has two working parts: the cutting edge and the depth gauge (or “raker”). The cutting edge slices the wood fibres, and the depth gauge controls how deep that slice goes. When the chain is sharp and the depth gauges are set correctly, the saw pulls itself into the wood and throws coarse chips. A dull chain scrapes instead of cutting, producing fine sawdust and forcing you to lean on the saw. That strains the engine and sharply increases the risk of a dangerous kickback.
Know the Tooth: The Anatomy of a Cutter
Before you pick up a file, it helps to know what you are actually sharpening. Every cutter is a small chisel, and the names matter because the methodology below refers to them:
- Top plate. The flat top of the cutter. Its leading edge is the main cutting edge, and the angle you file across it is the most important angle on the whole chain.
- Side plate. The vertical face that curls up from the top plate. It slices the side of the kerf.
- Working corner. Where the top plate and side plate meet. This corner does most of the cutting, and restoring this sharp corner is the entire point of sharpening.
- Gullet. The curved throat in front of the cutter that clears chips. Keep it clean; don’t file it away.
- Depth gauge (raker). The rounded fin ahead of each cutter. It sets how big a bite the cutter takes. Cutters and rakers wear together, so the rakers need attention too — more on that below.
The cutters alternate left, right, left, right along the chain. That is why sharpening is really two passes: all the left-hand cutters, then all the right-hand cutters.
❓When Do I Need to Sharpen My Chain?
Your saw will tell you plainly when it is time. Look out for these signs:
- The chain does not pull itself into the cut. You have to force it with downward pressure.
- You are getting fine sawdust instead of coarse chips. You want crunchy chips, not dust.
- The cut produces smoke, even with the chain properly oiled and tensioned. That is friction from a dull edge.
- The cut wanders to one side. The cutters on one side are duller (or longer) than the other.
- The saw chatters or bounces in the cut. Usually a depth-gauge problem — check and adjust the rakers.
One more cue worth trusting: the instant you suspect you clipped dirt, a stone, a nail or old fencing wire, stop and check. A single ground-strike can take the edge off every cutter in one pass.
The Tools You'll Need for the Job
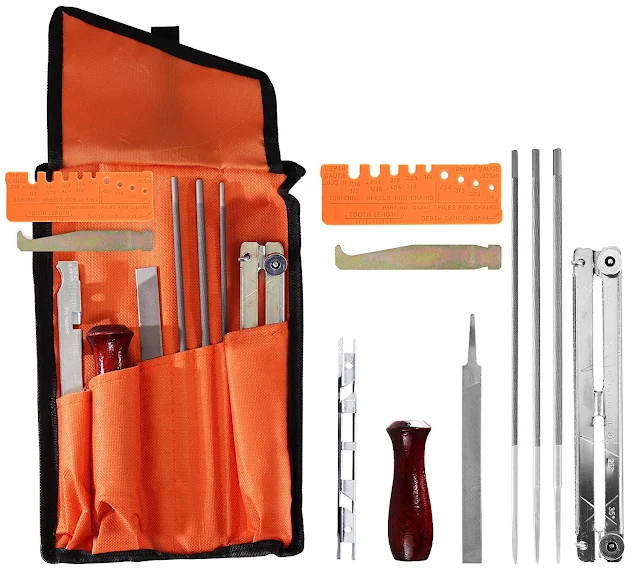
You have two options: a quick touch-up with a file, or doing the job properly with a full kit. We recommend the latter. Have on hand:
- A pair of safety gloves.
- Protective eyewear.
- A clamp or vice to hold the saw (or at least the bar) dead still. It is almost impossible to file accurately against a saw that rocks about.
- A round file of the correct diameter for your chain — this is not optional, and the right size is covered in the next section.
- A file guide (a flat plate guide, or better, a roller/clamp-on guide) to hold the angle and file height for you.
- A flat file and a depth-gauge tool for setting the rakers.
- A permanent marker, to mark the first cutter you sharpen so you know where you started.
A chainsaw sharpening kit bundles the round file, file guide and depth-gauge tool together, which is the easiest way to make sure the parts match. You can find all of it in these handy kits on Amazon.
The Best Way to Sharpen: File Size, Angles and Technique
This is where a good cut is won or lost. Get the file size, the angles and the stroke right, and the rest is just repeating yourself accurately around the chain.
1. Match the file to your chain
The round file has to match the diameter of the cutter’s edge, and that is set by the chain’s pitch — the spacing of the links. Use a file that is too small and you carve a hook into the tooth; too large and you never reach the cutting corner. Find your pitch stamped on the guide bar or the drive links, then match it:
| Chain pitch | Round file diameter |
|---|---|
| 1/4" | 4.0 mm (5/32") |
| 3/8" low-profile (Picco) | 4.0 mm (5/32") |
| 0.325" | 4.8 mm (3/16") |
| 3/8" standard | 5.2 mm (13/64") — some chains take 5.5 mm (7/32") |
| 0.404" | 5.5 mm (7/32") |
Always confirm against your own chain’s chart. File size can differ between brands such as Oregon and Stihl even at the same pitch, so the figures above are a starting point, not gospel. The number is usually printed on the chain’s packaging or the manufacturer’s lookup. The general rule: the bigger the pitch, the taller the cutters, and the larger the file.
2. Get the angles and file height right
Three things have to stay consistent on every single tooth:
- Top-plate filing angle. Looking down from above, the file is swept across the tooth at roughly 25–35°, with 30° a common all-round setting for crosscutting firewood. Most cutters carry a stamped witness line showing the intended angle — follow it.
- File height. About one-fifth of the file should sit above the top plate as you stroke. Too high and you round the edge over; too low and you undercut it. A roller or plate guide sets this for you automatically, which is exactly why a guide beats freehand for most people.
- File direction across the bar. Hold the file level (horizontal) and square across the bar unless your chain specifically calls for a slight down-angle. Keep the guide flat on the top plate and the depth gauge.
Get those three right and the side-plate angle largely takes care of itself, because it is a product of the correct file size sitting at the correct height. That is the quiet advantage of a guide: it locks the relationship in place so you only have to worry about the sweep.
3. The filing stroke that actually works
A file only cuts on the push. Use firm, even strokes away from you, across the cutter from the inside out, and lift the file clear on the return — dragging it back over the edge dulls both the file and the tooth. Let the file do the work; you are guiding it, not grinding. Two or three strokes is usually enough, so check your progress often, and rotate the file a little every so often to spread the wear and keep it cutting cleanly.
4. Work one side, then the other
Because the cutters alternate, sharpen all the teeth facing one direction first, then turn around (or rotate the saw in the vice) and do the others from the matching side. This keeps your body, the angle and the stroke identical for each group, which is what produces an even chain.
Two habits make this foolproof. First, mark your starting cutter with the permanent marker so you know when you have gone right around. Second, use the same number of strokes on every tooth and keep all cutters the same length. If one tooth is damaged shorter than the rest, the others should be brought back to match it — uneven cutter lengths are the classic cause of a saw that cuts in a curve.
Best practical rule: a file guide holds the angle, but it does not make you consistent. Equal strokes and even, gentle pressure on every cutter beat brute force every time. Sharpen little and check often.
Set the Depth Gauges (Rakers): The Step Most People Skip
Here is the bit that catches people out. Every time you sharpen, the cutter gets a fraction shorter and lower. The depth gauge in front of it does not — so over several sharpenings the raker ends up standing too tall relative to the cutter, and the tooth can no longer take a proper bite. You end up with a “sharp” chain that still will not pull into the wood.
Every few sharpenings, reset the rakers:
- Lay the depth-gauge tool across the chain so the raker pokes through the slot.
- File the protruding top of the raker flush with the tool using the flat file.
- Lightly round off the front edge of the raker back to its original bullet shape so it slides into the wood smoothly.
A common factory setting is around 0.65 mm (0.025"), but it varies by chain, so check your spec — and a progressive depth-gauge tool, which accounts for the cutter angle, is worth the few extra dollars. Get this wrong in either direction and you will feel it: too high and the chain cuts slowly and scrapes; filed too low and the chain turns aggressive and grabby, vibrates, and meaningfully raises kickback risk.
✅How to Safely Sharpen Your Chain: A Step-by-Step Guide
- Safety first: turn the saw off and disconnect the spark plug cap (or pull the battery) to prevent an accidental start.
- Tension the chain: if you are filing it on the bar, tension it properly first. A loose chain is impossible to sharpen accurately.
- Gear up: gloves and safety glasses on.
- Clean the chain: wipe off oil, grease and sawdust so the file does not gum up. Using the right bar and chain oil in the first place keeps this gunk to a minimum.
- Inspect for damage: check for cracked or broken cutters, bent drive links and loose rivets. If the chain is too worn or damaged to file true, fit a quality new chain instead — our guide on when to replace a chainsaw chain spells out where that line is.
- Mark your starting cutter with a permanent marker.
- Sharpen one side: seat the file guide, and with firm strokes push the file forwards across each cutter, lifting on the backstroke. Two or three strokes per tooth, same count every time.
- Sharpen the other side: turn around and repeat on the opposite-facing cutters, keeping every tooth the same length.
- Set the depth gauges with the depth-gauge tool and flat file, then round off the front of each raker.
- Finish up: brush off the filings, re-tension if needed, and check the chain is getting oil before you cut.
Here's a great video tutorial from the team at Bunnings Warehouse in New Zealand:
How Often Should You Sharpen?
The honest answer is: more often than you think, and a little at a time. The best operators touch up the chain little and often — a few strokes per cutter every time they refuel — rather than waiting until it is properly blunt. A quick touch-up on a chain that is only slightly dull takes minutes and removes almost no metal, so the chain lasts far longer. Letting it go fully blunt means more metal to grind back every time, and a harder, hotter, more dangerous cut in the meantime.
Reset the depth gauges every few sharpenings rather than every time, and after any encounter with dirt, stone, wire or a hidden fence staple, stop and inspect straight away. In a typical New Zealand woodpile — dirty pine, macrocarpa, reclaimed fence posts — the chain dulls faster than on clean timber, so keep the kit by the chopping block.
⚙Power Sharpening: Rotary Tools and Bench Grinders
Can I use a rotary tool to sharpen a chainsaw?
You sure can, if the grinding attachment is the right size for your chain. A good example is the Dremel 100-LG Lawn and Garden Rotary Tool Kit, which comes with sharpening attachments for mower blades, shears and chainsaws and spins at 35,000 RPM for quick work. The one caution: powered tools generate heat fast. Use light passes and keep the tool moving — if you let a cutter turn blue, you have drawn the temper out of the steel and that tooth will never hold an edge again.

Bench and clamp-on electric grinders
A bar-mount or bench grinder is the fastest way to bring a badly dulled or rock-struck chain back to a uniform edge, and it shines if you are sharpening several chains or restoring uneven cutter lengths. The trade-offs are the same as the rotary tool, only easier to overdo: it is simple to overheat a cutter (blue steel is ruined steel) and just as simple to grind away more metal than necessary, which shortens the chain’s life. Take light passes, let the cutter cool, keep the wheel dressed, and stop the moment the edges are even.
⚠️ What sharpening can’t fix
A file restores an edge — it does not perform miracles. It cannot mend a cracked or chipped cutter, rebuild a working corner that has been smashed off on a stone, or undo a tooth you have blued with a grinder. And if the saw still wanders after a careful, even sharpen, the problem may not be the chain at all but a worn or damaged guide bar. When you find yourself filing away far more metal than seems reasonable, that is the chain (or the bar) telling you it has had enough.
This guide pairs with the four basic rules of chainsaw chain maintenance and our rundown of the right bar and chain oil. For the bigger picture of keeping the saw cutting, start at how to maintain a chainsaw.


