When they are charged, tuned, and loaded with the right line, weed and grass trimmers are brilliant tools for cleaning up the edges of a lawn. They tidy the places a mower cannot reach, cut along fences, clean around garden beds, and sharpen the line between grass, concrete, and paths.
Then the string snaps.
Suddenly the job stops. The trimmer still runs, the battery still has charge, or the engine still has fuel, but the cutting line is gone. Replacing weed eater string can seem fiddly the first time, especially if the spool pops apart in your hands or the line keeps jamming when you try to feed it. I have knelt on a driveway with springs rolling under the car more than once.
The good news is that almost every trimmer line problem comes down to four things: line diameter, winding direction, spool tension, and how the head feeds new line. Get those right and this becomes a five-minute job instead of a wrecked Saturday morning.
⚡ Quick answer
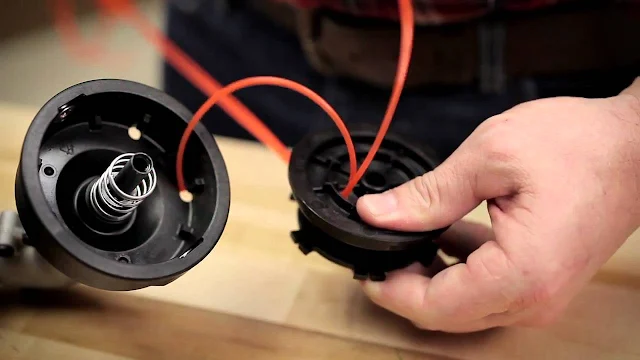
To replace weed eater string: disconnect the power, open the trimmer head, remove the empty spool, wind the correct diameter of new line in the direction marked on the spool, feed the line through the eyelet, reinstall the spool, and test the feed before trimming. A pre-wound replacement spool is the easiest option for most homeowners. Rewinding your existing spool is cheaper and gives you far more choice over line type.
📌 Start Here: The Trimmer Line Selection Guide
Before you touch a single tab on the spool cover, work out what line you should be loading. Most of the frustration people blame on the trimmer is really a line choice problem. Snapping every thirty seconds, welding itself solid inside the spool, bogging the motor down in ordinary grass: that is the line talking, not the tool. Fix the line and half the job fixes itself.
The single most useful number is diameter. Your trimmer was engineered around a specific line size, and the manufacturer prints it on the spool, the head, or the first page of the manual. That number is not a suggestion. It is the size the motor has the torque to swing and the feed system has the clearance to push through the eyelet. If you are shopping now, this range of replacement trimmer line covers the common homeowner diameters in one place.
| Line diameter | Best use | Good for | Watch out for |
|---|---|---|---|
| 0.065 inch | Light trimming | Small lawns, soft grass, light electric trimmers | Breaks quickly against concrete and thick weeds |
| 0.080 inch | General homeowner use | Normal grass, edging, fence lines, mixed yard work | Still not ideal for heavy scrub or woody weeds |
| 0.095 inch | Heavy residential trimming | Thick grass, tougher weeds, larger properties | May be too heavy for smaller battery trimmers |
| 0.105 inch and above | Heavy-duty or commercial work | Rough lots, dense weeds, powerful petrol trimmers | Only use if your trimmer head is designed for it |
What each diameter actually feels like in the yard
0.065 inch: the light-duty option
This is what small cordless and corded trimmers ship with, and it is the right call for a tidy suburban lawn. It cuts soft grass cleanly, feeds without complaint, and barely loads the motor, so your battery lasts noticeably longer.
The honest correction: it is fragile. One pass along a brick path or a wire fence and you will be bumping for more line every few metres. If you find yourself refilling the spool twice per mow, you have not bought bad line. You have bought the wrong diameter for your yard.
0.080 inch: the safe default
If you only ever buy one size, buy this one. It is the sweet spot for the average property: enough body to survive concrete edges and fence posts, still light enough that a mid-range battery trimmer swings it at full speed. Most 18V and 40V machines are happiest here.
Practical tip: 0.080 is also the most forgiving size to hand-wind. It is stiff enough to hold its shape on the spool but flexible enough that it does not fight you through the eyelet.
0.095 inch: step up only if the yard demands it
This is where you go when the property has rough corners: long grass down the back, weeds along a gravel strip, a section that only gets cut every few weeks. The extra mass keeps the tip cutting instead of deflecting, and it survives a lot more punishment per length.
Watch the cost: heavier line means more drag, which means lower head speed, hotter motors, and shorter battery run time. A trimmer rated to 0.080 will run 0.095 badly rather than well. Check the head first, because the maximum size is usually moulded into the plastic.
0.105 inch and above: petrol territory
This is commercial-grade line for straight-shaft petrol machines and big brushcutter heads working rough lots and dense scrub. It will cut through material that stops a homeowner trimmer dead.
Important warning: do not force heavy line into a head that was not built for it. Oversized line jams the feed, wears the eyelets into sharp edges, and puts load on a clutch or motor that was never specified for it. If it takes real effort to thread, it is too big.
💡 The one rule that overrides everything else
Thicker is not better. Matched is better. A trimmer running its specified diameter at full head speed will out-cut the same trimmer choking on oversized line every single time. Speed does the cutting, not bulk.
Line shape: round, square, or twisted
Once diameter is settled, shape is the next lever. Round line is the default: it feeds smoothly, runs quietly, resists welding inside the spool, and suits ordinary lawn work. Square and multi-sided line has actual edges, so it slices rather than beats its way through thick growth. The trade-off is more noise, more vibration, and faster wear on hard surfaces. Twisted line sits in between: quieter and less prone to that harsh whine, with a bit more bite than plain round.
Best practical rule: start with round or twisted line in your machine’s specified diameter. Only move to square or heavier profiles once you have proved your trimmer has the power and your yard has the growth to justify it.
Which trimmer line to buy
A neat suburban lawn does not need the same line as a rough section full of thick weeds. Match the line to the tool and the job rather than grabbing the toughest-looking option on the shelf.
| Trimmer line | Best for | Why it works | Watch out for |
|---|---|---|---|
| Oregon Magnum Gatorline | Heavy weeds and thick grass | Its durable, square profile gives it a more aggressive cutting edge, which helps when ordinary round line wears down too quickly. | Check your trimmer’s maximum line size before using heavier versions. |
| Arnold Maxi Edge | Tall grass and general yard cleanup | Its multi-sided profile improves cutting performance while still being practical for homeowner use. | May be more aggressive around soft bark, posts, and delicate garden edging. |
| Husqvarna Titanium Force | Trimming and edging | It is made from a commercial-grade copolymer designed to balance durability, cutting efficiency, and smoother operation. | Choose the diameter that matches your trimmer, especially on battery models. |
| Weed Warrior Pulverizer Twist | Moderately dense grass and weeds | Its twisted design can offer better durability and lower vibration, which is useful for longer trimming sessions. | Twisted line can feed differently in some heads, so test it before tackling the whole yard. |
| DEWALT Trimmer Line | Lighter weeds, grass, and regular lawn edges | It is flexible, impact-resistant, and easy to install, making it a sensible choice for routine home trimming. | For thick scrub or rough sections, you may need a heavier line if your trimmer supports it. |
Bottom line on buying: confirm the diameter your head takes, then pick the profile that matches your worst patch of yard rather than your neatest. Buying a longer spool of the correct size beats buying a short spool of something heroic you cannot run.
🔍 What Weed Eater String Actually Is
A weed eater’s string is not really string in the normal sense. It is a tough plastic monofilament, most often nylon or a nylon copolymer blend. It is floppy in your hand, but once the head spins at several thousand RPM the line goes rigid enough to cut grass and weeds.
Unlike a metal lawn mower blade, trimmer line does not rely on a sharpened edge. It cuts through speed, impact, and tension. Centrifugal force pulls the line outward, it behaves like a fast-moving whip, and the outer inch or two of the tip does nearly all the work.
The key point: most people try to cut with the whole length of line. That bogs the head down, wastes line, and drains a battery fast. Cut with the tip, move steadily, and let the tool do the work rather than shoving the head into the grass.
⚠️ Why trimmer line breaks
Line wears every time it hits concrete, brick, stones, fences, edging, tree bark, or dry woody weeds. Heat, age, cheap plastic, the wrong diameter, and sloppy spool winding all make line snap more often than it should. Old line that has dried out in a hot garage is a particularly common culprit, because it goes brittle and shatters on the first hard contact.
🛡️ Before You Start: Safety and Compatibility Checks
Before replacing the line, make sure the trimmer cannot start accidentally. This is the step people skip because the job looks harmless. Do not skip it. A trimmer head can bite hard, even when you are only working around the spool.
- Remove the battery from a cordless trimmer, rather than just switching it off.
- Unplug a corded electric trimmer at the wall.
- Switch off a petrol trimmer and let the engine and head cool before working near them.
- Wear gloves if the spool housing is dirty, cracked, or packed with grass.
- Wear eye protection when testing the trimmer after replacing the line.
- Check the manual or spool label for the recommended line diameter and capacity.
⛔ Do not fit random cutting material
Never replace trimmer line with wire, cable, fishing line, metal cord, or any improvised cutting material. It can wreck the tool and turn into a dangerous projectile. Use proper nylon trimmer line in the size the manufacturer specifies.
🛠️ How to Replace the String on Your Weed Eater
There are four ways this goes, depending on your head. You can drop in a pre-wound replacement spool, refill your existing spool by hand, thread a speed-feed head without opening it, or slot in fixed pieces. Designs vary by brand, but the principles below hold across almost all of them.
Method 1: Replacing a pre-wound spool
Who this suits: anyone who trims a handful of times a season, anyone whose spool has already jammed once, and anyone who would rather spend a few extra dollars than kneel on a driveway rewinding nylon. The winding is done at the factory, evenly, at the correct tension, which removes the single biggest cause of feed failure.
- Disconnect the power. Battery out, cord unplugged, or engine off and cool.
- Turn the trimmer over. Rest it on a bench or table so the head faces up and you can use both hands. Doing this at ground level is how springs get lost.
- Remove the spool cover. Most covers have two side tabs you squeeze inward; some heads unscrew, usually counter-clockwise. Cup a hand over the cover as it releases, because there is often a spring under it.
- Lift out the empty spool. Note which way up it sat and where the spring and washer live. A quick phone photo before you pull it apart saves a lot of guesswork.
- Clean the housing. Packed grass, dust, and broken line stubs are why the next spool binds. Wipe it out and clear the eyelets with a screwdriver tip.
- Thread the line through the eyelet. Feed the loose end out through the exit hole before the spool is fully seated. Trying to thread it afterwards is fiddly and often impossible.
- Seat the spool. It should drop flat and rotate with light resistance. If it rocks or sits proud, the spring or washer is out of place.
- Replace the cap. Both tabs must click. A cover that is only half latched will fly off at speed.
- Test the feed. Reconnect power, run the trimmer for a few seconds in open space, and bump once. The guard-mounted cutter should trim the line to length automatically.
Buy two, keep one loaded
The real advantage of pre-wound spools is having a spare in your pocket. Swapping a spool mid-job takes about ninety seconds; rewinding one on the lawn takes ten minutes and your patience.
Method 2: Rewinding an empty spool by hand
Who this suits: anyone trimming regularly or over a big property. Bulk line is dramatically cheaper per metre and lets you choose exactly the profile you want. It is also where nearly every feed problem is born, so slow down for the winding step.
- Confirm the correct line diameter. The spool, manual, or head casting will state it. Guessing here undoes everything that follows.
- Cut the right length. Most homeowner spools take roughly 10 to 25 feet (3 to 7.5 m). If your spool has two chambers, cut two equal lengths, roughly half each. Do not overfill. More line on the spool does not mean more trimming; it means jamming.
- Find the anchor. Push one end into the small starting hole or notch, and bend a short tail over so it locks. If the line will not stay put while you wind, it is not anchored properly.
- Wind in the marked direction. Look for a moulded arrow and a word like “WIND” on the spool face. This is the number one reason line refuses to feed. Wound backwards, the bump mechanism pulls against the wrap instead of releasing it, and no amount of tapping will help.
- Keep the wraps neat and flat. Firm and even, side by side like thread on a reel. Not so tight that the line bites into the layer beneath, because crushed nylon binds under heat.
- Never cross the layers. A single crossed wrap can lock the whole spool solid. If it looks messy halfway through, unwind and start again; it will not sort itself out.
- Stay below the rim. If the coil sits above the edge of the spool flange, take some off. Line that touches the housing wall drags and heats.
- Leave a tail. Keep about 5 to 6 inches (13 to 15 cm) free, and park it in the small retaining notch on the spool rim so it does not unravel while you reassemble.
- Reinstall. Feed the tail out through the eyelet, drop the spool in, refit the spring and cover, and click both tabs home.
💡 A simple winding rule
Wind in clean, even layers, in the marked direction, and stop before the spool is full. If the line sits above the flange or feels jammed before you reinstall it, it will definitely jam once it is spinning. Pull some off and rewind.
Method 3: Loading a speed-feed trimmer head
Who this suits: anyone with a newer petrol or premium battery machine, and anyone who hates disassembly. These heads, sold as speed-feed, quick-load, or easy-load, let you thread a single length straight through and wind it in without opening anything. Once you have done it twice it takes under a minute.
- Line up the arrows. Rotate the knob until the arrows or slots on the knob and housing align. If the line will not push through, they are not aligned. Do not force it.
- Feed a single length straight through. Push it in one side and out the other, then pull until both ends are even. Cutting a clean, square end on the line first makes this far easier; a frayed end catches inside the head.
- Turn the knob in the marked direction. Usually clockwise, and usually marked on the head itself.
- Stop with the right length showing. Wind until roughly 6 inches (15 cm) remains on each side. Leaving too much just means the guard cutter trims it off on the first pull of the trigger.
- Test briefly. Run the trimmer for a few seconds and confirm the line stays put and cuts evenly on both sides.
Watch out for: these heads are convenient but fussier about line quality than a plain spool. Stiff, oversized, or heavily shaped line binds inside the mechanism. If the knob suddenly needs real force, back the line out and check the diameter before you strip a plastic thread.
Method 4: Replacing fixed-line pieces
Who this suits: owners of bladed or bump-free heads that take short pre-cut pieces slotted into the head. There is no spool, no spring, and nothing to wind, which makes this the most reliable system of all for occasional trimming, at the cost of stopping to reload more often.
- Clear the old stubs. Pull or push out every broken remnant. A short piece left jammed in one slot throws the head out of balance and you will feel the vibration immediately.
- Cut replacements to matching lengths. Use the manufacturer’s pre-cut pieces if you have them; if you are cutting your own, make every piece identical. Uneven lengths mean an unbalanced head and a shaking shaft.
- Seat each piece fully. Push into the locking slot or hole until it clicks or bottoms out, following the direction shown on the head.
- Tug-test every piece. A firm pull on each one. Anything that slides is not locked, and it will leave the head at speed.
- Always replace in pairs or full sets. Never run a head with one slot loaded and one empty, even briefly.
- Start at low speed. Listen for vibration before returning to full throttle.
⚠️ Why Your Trimmer Line Keeps Breaking, Jamming, or Failing to Feed
If your line breaks every few minutes, the trimmer is telling you something. The line may be wrong for the job, the spool may be wound badly, or the head may simply be worn out.
| Problem | Likely cause | How to fix it |
|---|---|---|
| Line keeps snapping | Line is old, brittle, too thin, or hitting hard surfaces | Use fresh line, move up a diameter, and cut with the tip rather than grinding into concrete. |
| Line will not feed | Spool wound too tightly, crossed line, wrong winding direction, or worn bump cap | Rewind neatly in the marked direction and inspect the cap and spring. |
| Line feeds too much | Bump mechanism sticking or spool not seated correctly | Clean the head, check the spring, and make sure the spool locks into place. |
| Line welds together inside the spool | Friction heat, heavy cutting, or line wound under too much tension | Use better quality line, ease off the load, and rewind without crushing the layers together. |
| Trimmer bogs down | Line is too thick or too long for the tool | Return to the recommended diameter and make sure the guard cutter is trimming line to length. |
| Line breaks right at the eyelet | Rough, cracked, or worn eyelet is sawing through the line | Inspect the eyelets and replace the head or worn parts if they feel sharp or grooved. |
📌 Which Trimmer Line Should You Use for Each Job?
The best trimmer line depends on where you are cutting. A line that is perfect for a soft lawn edge may shred against concrete, and a line that eats rough weeds may be too heavy for a small cordless machine.
Light lawn edges
Round or twisted line in a light to medium diameter. It feeds easily and is plenty for soft grass around paths and beds.
Fence lines
Durable line, light hands. Let the tip cut and stay off the wire. Wire mesh and timber posts chew through line faster than anything else in the yard.
Thick weeds
Square, multi-sided, or heavier line if your trimmer supports it. Work top-down in passes rather than forcing the whole head into dense growth.
Around trees
Careful. Trimmer line strips bark, and repeated ringing of a young trunk can kill the tree. Leave a mulch collar or fit trunk guards instead of trimming tight.
Concrete and driveways
Expect faster wear whatever you use. Cut with the very end of the line and avoid grinding it into the surface.
Battery trimmers
Stay close to the recommended size. Heavy line lowers head speed and shortens run time noticeably. You lose more in performance than you gain in toughness.
💡 Pro Tip: How to Edge Your Lawn with a Trimmer
A weed eater will cut a clean edge along sidewalks, driveways, and paths. Turn the trimmer so the head runs vertical, roughly 90 degrees to the ground. Start the tool before lowering the line into the edge, then walk steadily along the concrete.
The trick is control. Let the line tip do the cutting and never jam the head into the concrete. That wastes line, throws grit, and leaves a ragged edge. A slow, steady pass beats one aggressive sweep every time.
✅ A better edging habit
Edge first, then mow. The mower collects the loose clippings and the finished result looks a great deal tidier.
🔄 How to Make Trimmer Line Last Longer
Trimmer line is meant to wear down, but it should not vanish in one afternoon. A few habits will make a spool last much longer.
- Cut with the tip. Burying the head in grass wastes line and power.
- Stay off hard surfaces. Concrete, stone, metal edging, and brick are line-killers.
- Run the right diameter. Undersized line snaps; oversized line jams.
- Store line cool and dark. Heat and UV make nylon brittle. A sealed bag in the shed beats a sunny window sill.
- Soak old line before use. A few hours in water can restore some flexibility to line that has dried out in storage.
- Clean the head regularly. Packed clippings hold heat and cause welding inside the spool.
- Check the eyelets and bump cap. Worn parts destroy good line before it ever reaches the grass.
✅ Final Checklist Before You Start Trimming
- Battery removed, cord unplugged, or engine fully off before replacing line.
- Correct line diameter confirmed against the manual or head.
- Housing cleaned and eyelets inspected.
- Line wound in the marked direction.
- Wraps even, flat, uncrossed, and below the spool rim.
- Spool cover clicked securely into place on both tabs.
- Eye protection worn for the first test run.
Once you know how your trimmer head opens, how the spool winds, and what line size your machine likes, replacing weed eater string becomes a quick maintenance job rather than a mid-lawn headache. Keep the right line on hand, wind it cleanly, and cut with the tip. Your trimmer will run better, the line will last longer, and your lawn edges will look a lot sharper.
Once you have mastered your yard work, perhaps it is time to reward yourself and learn how to homebrew beer.
